How to Embed your HTML5 Content in a Website
iSpring Suite can convert courses to a web-friendly HTML5 format. All PowerPoint functionality like animations, transitions, video, and audio, will be maintained. A great advantage of HTML5 slides is that they can be viewed on virtually any PC or mobile device, including iPads.
You can embed your HTML5 content in a website or blog. To do this, follow this simple step-by-step guide:
Publishing a Course to HTML5
- Open a PowerPoint and select the iSpring Suite 10 tab. Then, click Publish.

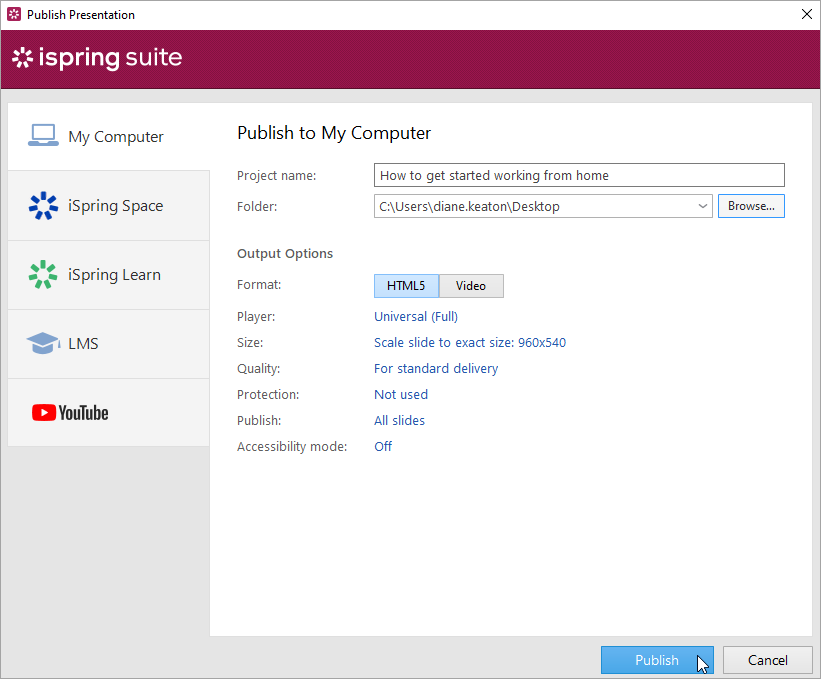
- Choose the My Computer tab, enter the course's name, and configure its settings. Finally, click Publish.

Done! You’ve published the course in HTML5 format.
Uploading a Course to a Server
After the publishing process is over, upload the course to the server. To do this:
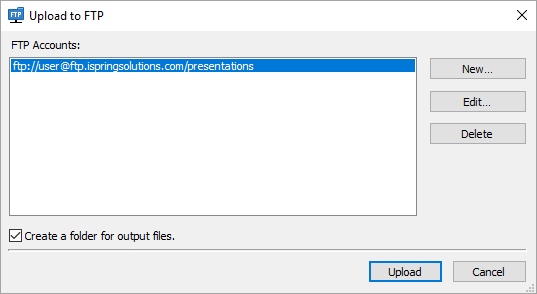
Click FTP in the window which opens after publishing.
 What is FTP and how it works
FTP is a file transfer protocol that allows you to upload files to a server.
To obtain your FTP account login info, contact your hosting provider. They will supply you with the following data: the host name, the user name, and the password.
To log in to the server, download an FTP client — a program that provides access to a server. One of the most popular FTP clients is FileZilla.- You will see a window where you can add, edit and delete FTP accounts. Select the Create a folder for output files checkbox to create a new folder with the course name on your server.

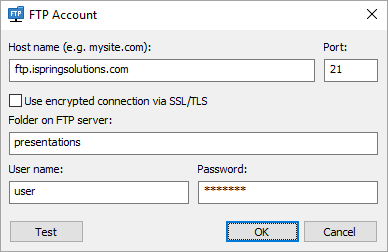
Then, in the opened window, enter the FTP login info that you have received from your hosting provider. Finally, click OK.

FTP Account Host name The host name (e.g. mysite.com) or IP address (e.g. 77.77.55.88) of the web server where the presentation will be uploaded to. Port FTP servers generally use Port 21, but sometimes the port number may differ. For more information, contact your network administrator. Use encrypted connection via SSL/TLS The program will establish a secure connection with a server using FTP with TLS/SSL (FTPS). Folder on FTP server The path to a folder on the FTP server. User name If anonymous access to the FTP is not allowed, type your user name. Password If anonymous access to the FTP is not allowed, type your password. +
Next, you need to find out the HTTP URL of the uploaded HTML5 presentation and copy the URL to the clipboard. The URL of the presentation depends on the specific settings of your server.
Make sure that the selected URL starts with ‘http://’ and not ‘ftp://’
Inserting your HTML5 presentation into a website
After you’ve uploaded the course to the server, insert it into a web site. You can insert a course in three ways:
Play your HTML5 Presentation on a Separate Webpage
One of the easiest ways to share your presentation via a website is to provide a hyperlink to the presentation somewhere on a web page. To insert a hyperlink, switch to the HTML editing mode and use the following code:
<a title="CUSTOM TITLE OF THE LINK" href=”ENTER YOUR URL” target=”_blank”> CUSTOM TEXT OF THE HYPERLINK</a> You can choose to open the presentation in a new browser tab (target=”_blank”) or in the same tab (target=“_self”).
Play your HTML5 Presentation as a Pop-up
To have your presentation open in a pop-up window, make sure your website allows the use of JavaScript code.
You can use the following code to create an on click pop-up:
<script>  function popup(url)
{
     window.open(url, 'new', 'width=800,height=600,scrollbars=no,menubar=no,status=no,toolbar=no');
}
</script>
<a onClick="popup('http:// ENTER YOUR URL ')">CUSTOM TEXT OF THE HYPERLINK</a> You can customize the width and height and add different elements to your pop-up (learn more here).
Or, you can set the pop-up window to appear as soon as the webpage is loaded:
<script>  function popup(url)
{
     window.open(url, 'new', 'width=800,height=600,scrollbars=no,menubar=no,status=no,toolbar=no');
}
popup('http://ENTER YOUR URL');
</script>Insert your HTML5 presentation into an HTML iFrame Tag
If you want to show your HTML5 presentation within your webpage, you can insert it into an iFrame using the following HTML code:
<iframe src="http://ENTER YOUR URL" width="800" height="600" scrolling=”no” />If published on your website in one of the ways described above, your HTML5 presentation can be delivered to much wider audiences using modern web browsers, mobile devices, and iPads. Learn more about HTML iFrames.